Bài này hướng dẫn những bước đầu tiên với Model Context Protocol (MCP): chuẩn bị môi trường, xây một MCP server cơ bản và kiểm thử nó. Dù bạn mới làm quen với MCP hay muốn hiểu sâu hơn, bạn sẽ thấy MCP giúp tích hợp (integration) liền mạch giữa model AI và ứng dụng ra sao, và nhanh chóng có môi trường sẵn sàng để xây, thử các giải pháp dùng MCP.
Tóm tắt nhanh: nếu bạn xây ứng dụng AI, bạn biết có thể thêm tool và các resource khác vào LLM để LLM hiểu biết hơn. Nhưng nếu đặt các tool và resource đó trên một server, ứng dụng và các khả năng (capability) của server có thể được dùng bởi bất kỳ client nào, có hoặc không có LLM.
Tổng quan
Bài này hướng dẫn thực hành cách thiết lập môi trường MCP và xây ứng dụng MCP đầu tiên. Bạn sẽ học cách cài công cụ và framework cần thiết, xây MCP server cơ bản, tạo ứng dụng host và kiểm thử phần cài đặt.
Model Context Protocol (MCP) là một giao thức mở chuẩn hoá cách ứng dụng cung cấp ngữ cảnh cho LLM. Hãy hình dung MCP như cổng USB-C cho ứng dụng AI: một cách chuẩn để kết nối model AI với các nguồn dữ liệu và tool khác nhau.
Mục tiêu học tập
Sau bài này, bạn sẽ có thể:
- Thiết lập môi trường phát triển MCP bằng C#, Java, Python, TypeScript và Rust.
- Xây và triển khai (deploy) MCP server cơ bản với các tính năng tuỳ chỉnh (resource, prompt và tool).
- Tạo ứng dụng host kết nối tới MCP server.
- Kiểm thử và gỡ lỗi phần cài đặt MCP.
Thiết lập môi trường MCP
Trước khi làm việc với MCP, cần chuẩn bị môi trường phát triển và hiểu quy trình (workflow) cơ bản.
Điều kiện cần
Trước khi phát triển MCP, hãy đảm bảo bạn có:
- Môi trường phát triển: cho ngôn ngữ bạn chọn (C#, Java, Python, TypeScript hoặc Rust).
- IDE/trình soạn thảo: Visual Studio, Visual Studio Code, IntelliJ, Eclipse, PyCharm hoặc bất kỳ trình soạn thảo hiện đại nào.
- Trình quản lý gói: NuGet, Maven/Gradle, pip, npm/yarn hoặc Cargo.
- API key: cho các dịch vụ AI bạn định dùng trong ứng dụng host.
Cấu trúc cơ bản của MCP server
Một MCP server thường gồm:
- Cấu hình server: thiết lập cổng, xác thực và các cài đặt khác.
- Resource: dữ liệu và ngữ cảnh cung cấp cho LLM.
- Tool: chức năng model có thể gọi.
- Prompt: mẫu để sinh hoặc cấu trúc văn bản.
Đây là ví dụ đơn giản bằng TypeScript:
import { McpServer, ResourceTemplate } from "@modelcontextprotocol/sdk/server/mcp.js";
import { StdioServerTransport } from "@modelcontextprotocol/sdk/server/stdio.js";
import { z } from "zod";

// Create an MCP server
const server = new McpServer({
  name: "Demo",
  version: "1.0.0"
});

// Add an addition tool
server.tool("add",
  { a: z.number(), b: z.number() },
  async ({ a, b }) => ({
    content: [{ type: "text", text: String(a + b) }]
  })
);

// Add a dynamic greeting resource
server.resource(
  "file",
  // The 'list' parameter controls how the resource lists available files. Setting it to undefined disables listing for this resource.
  new ResourceTemplate("file://{path}", { list: undefined }),
  async (uri, { path }) => ({
    contents: [{
      uri: uri.href,
      text: `File, ${path}!`
    }]
  })
);

// Add a file resource that reads the file contents
server.resource(
  "file",
  new ResourceTemplate("file://{path}", { list: undefined }),
  async (uri, { path }) => {
    let text;
    try {
      text = await fs.readFile(path, "utf8");
    } catch (err) {
      text = `Error reading file: ${err.message}`;
    }
    return {
      contents: [{
        uri: uri.href,
        text
      }]
    };
  }
);

server.prompt(
  "review-code",
  { code: z.string() },
  ({ code }) => ({
    messages: [{
      role: "user",
      content: {
        type: "text",
        text: `Please review this code:\n\n${code}`
      }
    }]
  })
);

// Start receiving messages on stdin and sending messages on stdout
const transport = new StdioServerTransport();
await server.connect(transport);
Trong code trên, chúng ta:
- Import các lớp cần thiết từ MCP TypeScript SDK.
- Tạo và cấu hình một MCP server mới.
- Đăng ký một tool tuỳ chỉnh (
calculator) kèm hàm xử lý. - Khởi động server để lắng nghe các yêu cầu (request) MCP gửi tới.
Kiểm thử và gỡ lỗi
Trước khi kiểm thử MCP server, cần biết các công cụ có sẵn và best practice để gỡ lỗi. Kiểm thử hiệu quả giúp server hoạt động như mong đợi và nhanh chóng tìm ra, sửa lỗi.
MCP có các công cụ giúp kiểm thử và gỡ lỗi server:
- Inspector: giao diện đồ hoạ cho phép kết nối tới server và thử các tool, prompt, resource.
- curl: bạn cũng có thể kết nối tới server bằng công cụ dòng lệnh như curl hoặc các client khác tạo và chạy được lệnh HTTP.
Dùng MCP Inspector
MCP Inspector là công cụ kiểm thử trực quan, giúp bạn:
- Khám phá capability của server: tự động phát hiện các resource, tool và prompt có sẵn.
- Thử chạy tool: thử các tham số khác nhau và xem phản hồi (response) theo thời gian thực.
- Xem metadata của server: xem thông tin server, schema và cấu hình.
# ex TypeScript, installing and running MCP Inspector
npx @modelcontextprotocol/inspector node build/index.js
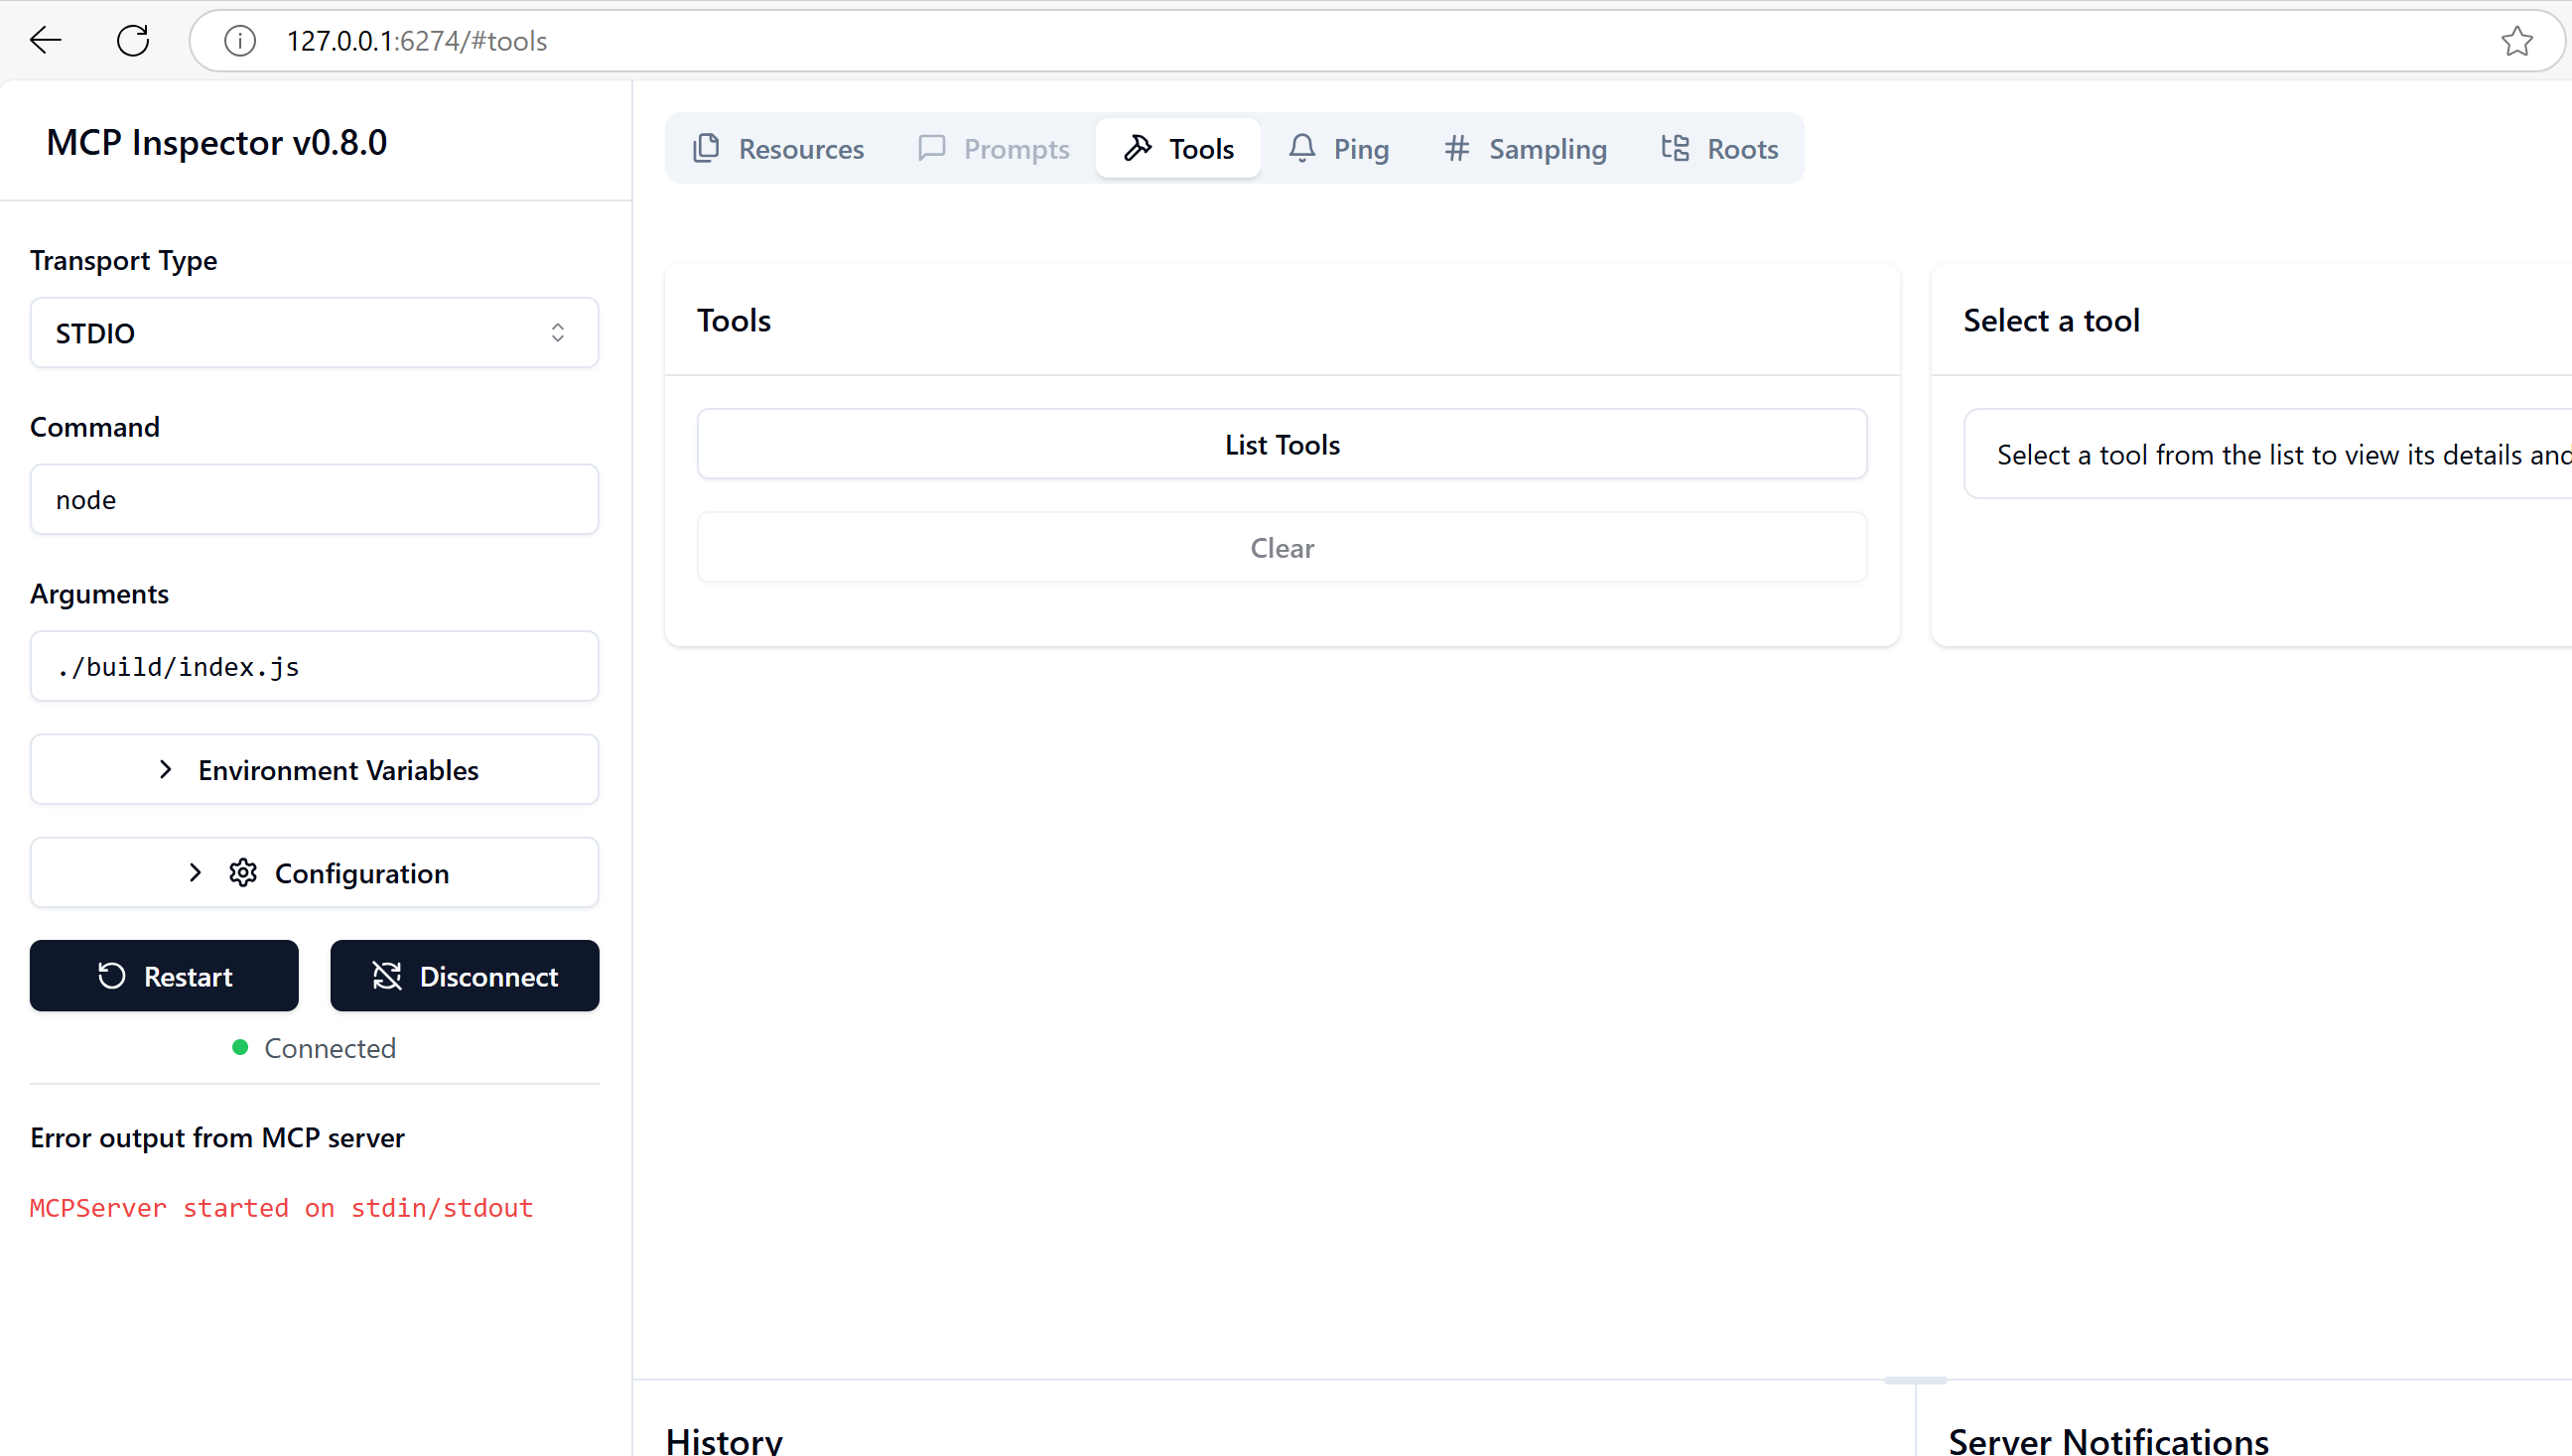
Khi chạy lệnh trên, MCP Inspector mở một giao diện web local trên trình duyệt. Bạn sẽ thấy một bảng điều khiển hiển thị các MCP server đã đăng ký, tool, resource và prompt của chúng. Giao diện cho phép thử chạy tool, xem metadata của server và phản hồi theo thời gian thực, giúp kiểm chứng và gỡ lỗi server dễ hơn.
Đây là ảnh chụp màn hình minh hoạ:
Lỗi thiết lập thường gặp và cách xử lý
| Lỗi | Cách xử lý có thể |
|---|---|
| Connection refused | Kiểm tra server có đang chạy và cổng có đúng không |
| Lỗi khi chạy tool | Xem lại phần kiểm tra tham số và xử lý lỗi |
| Xác thực thất bại | Kiểm tra API key và quyền |
| Lỗi kiểm tra schema | Đảm bảo tham số khớp schema đã định nghĩa |
| Server không khởi động | Kiểm tra xung đột cổng hoặc thiếu dependency |
| Lỗi CORS | Cấu hình header CORS phù hợp cho request khác origin |
| Vấn đề xác thực | Kiểm tra token còn hợp lệ và quyền |
Phát triển ở máy local
Để phát triển và kiểm thử ở máy local, bạn có thể chạy MCP server trực tiếp trên máy:
- Khởi động tiến trình server: chạy ứng dụng MCP server.
- Cấu hình mạng: đảm bảo server truy cập được ở cổng mong muốn.
- Kết nối client: dùng URL local như
http://localhost:3000.
# Example: Running a TypeScript MCP server locally
npm run start
# Server running at http://localhost:3000
Xây MCP server đầu tiên
Bài trước của khoá gốc đã nói về các khái niệm cốt lõi (khoá MCP của Hugging Face cũng có phần này). Giờ là lúc áp dụng kiến thức đó.
Server làm được gì
Trước khi viết code, hãy nhắc lại một server làm được gì. Ví dụ, một MCP server có thể:
- Truy cập file và cơ sở dữ liệu local
- Kết nối tới API từ xa
- Thực hiện tính toán
- Tích hợp với các tool và dịch vụ khác
- Cung cấp giao diện để tương tác
Tốt, giờ đã biết server làm được gì, hãy bắt đầu viết code.
Bài thực hành: tạo server
Để tạo server, bạn làm theo các bước:
- Cài MCP SDK.
- Tạo project và cấu trúc thư mục.
- Viết code server.
- Kiểm thử server.
Bước 1: tạo project
# Create project directory and initialize npm project
mkdir calculator-server
cd calculator-server
npm init -y
# Create project dir
mkdir calculator-server
cd calculator-server
# Open the folder in Visual Studio Code - Skip this if you are using a different IDE
code .
dotnet new console -n McpCalculatorServer
cd McpCalculatorServer
Với Java, tạo một project Spring Boot:
curl https://start.spring.io/starter.zip \
  -d dependencies=web \
  -d javaVersion=21 \
  -d type=maven-project \
  -d groupId=com.example \
  -d artifactId=calculator-server \
  -d name=McpServer \
  -d packageName=com.microsoft.mcp.sample.server \
  -o calculator-server.zip
Giải nén file zip:
unzip calculator-server.zip -d calculator-server
cd calculator-server
# optional remove the unused test
rm -rf src/test/java
Thêm cấu hình đầy đủ sau vào file pom.xml:
<?xml version="1.0" encoding="UTF-8"?>
<project xmlns="http://maven.apache.org/POM/4.0.0"
    xmlns:xsi="http://www.w3.org/2001/XMLSchema-instance"
    xsi:schemaLocation="http://maven.apache.org/POM/4.0.0 http://maven.apache.org/xsd/maven-4.0.0.xsd">
    <modelVersion>4.0.0</modelVersion>

    <!-- Spring Boot parent for dependency management -->
    <parent>
        <groupId>org.springframework.boot</groupId>
        <artifactId>spring-boot-starter-parent</artifactId>
        <version>3.5.0</version>
        <relativePath />
    </parent>

    <!-- Project coordinates -->
    <groupId>com.example</groupId>
    <artifactId>calculator-server</artifactId>
    <version>0.0.1-SNAPSHOT</version>
    <name>Calculator Server</name>
    <description>Basic calculator MCP service for beginners</description>

    <!-- Properties -->
    <properties>
        <java.version>21</java.version>
        <maven.compiler.source>21</maven.compiler.source>
        <maven.compiler.target>21</maven.compiler.target>
    </properties>

    <!-- Spring AI BOM for version management -->
    <dependencyManagement>
        <dependencies>
            <dependency>
                <groupId>org.springframework.ai</groupId>
                <artifactId>spring-ai-bom</artifactId>
                <version>1.0.0-SNAPSHOT</version>
                <type>pom</type>
                <scope>import</scope>
            </dependency>
        </dependencies>
    </dependencyManagement>

    <!-- Dependencies -->
    <dependencies>
        <dependency>
            <groupId>org.springframework.ai</groupId>
            <artifactId>spring-ai-starter-mcp-server-webflux</artifactId>
        </dependency>
        <dependency>
            <groupId>org.springframework.boot</groupId>
            <artifactId>spring-boot-starter-actuator</artifactId>
        </dependency>
        <dependency>
         <groupId>org.springframework.boot</groupId>
         <artifactId>spring-boot-starter-test</artifactId>
         <scope>test</scope>
      </dependency>
    </dependencies>

    <!-- Build configuration -->
    <build>
        <plugins>
            <plugin>
                <groupId>org.springframework.boot</groupId>
                <artifactId>spring-boot-maven-plugin</artifactId>
            </plugin>
            <plugin>
                <groupId>org.apache.maven.plugins</groupId>
                <artifactId>maven-compiler-plugin</artifactId>
                <configuration>
                    <release>21</release>
                </configuration>
            </plugin>
        </plugins>
    </build>

    <!-- Repositories for Spring AI snapshots -->
    <repositories>
        <repository>
            <id>spring-milestones</id>
            <name>Spring Milestones</name>
            <url>https://repo.spring.io/milestone</url>
            <snapshots>
                <enabled>false</enabled>
            </snapshots>
        </repository>
        <repository>
            <id>spring-snapshots</id>
            <name>Spring Snapshots</name>
            <url>https://repo.spring.io/snapshot</url>
            <releases>
                <enabled>false</enabled>
            </releases>
        </repository>
    </repositories>
</project>
mkdir calculator-server
cd calculator-server
cargo init
Bước 2: thêm dependency
Đã có project, giờ thêm dependency:
# If not already installed, install TypeScript globally
npm install typescript -g

# Install the MCP SDK and Zod for schema validation
npm install @modelcontextprotocol/sdk zod
npm install -D @types/node typescript
# Create a virtual env and install dependencies
python -m venv venv
venv\Scripts\activate
pip install "mcp[cli]"
cd calculator-server
./mvnw clean install -DskipTests
cargo add rmcp --features server,transport-io
cargo add serde
cargo add tokio --features rt-multi-thread
Bước 3: tạo file project
Mở file package.json và thay nội dung bằng đoạn sau để build và chạy được server:
{
  "name": "calculator-server",
  "version": "1.0.0",
  "main": "index.js",
  "type": "module",
  "scripts": {
    "build": "tsc",
    "start": "npm run build && node ./build/index.js",
  },
  "keywords": [],
  "author": "",
  "license": "ISC",
  "description": "A simple calculator server using Model Context Protocol",
  "dependencies": {
    "@modelcontextprotocol/sdk": "^1.16.0",
    "zod": "^3.25.76"
  },
  "devDependencies": {
    "@types/node": "^24.0.14",
    "typescript": "^5.8.3"
  }
}
Tạo tsconfig.json với nội dung:
{
  "compilerOptions": {
    "target": "ES2022",
    "module": "Node16",
    "moduleResolution": "Node16",
    "outDir": "./build",
    "rootDir": "./src",
    "strict": true,
    "esModuleInterop": true,
    "skipLibCheck": true,
    "forceConsistentCasingInFileNames": true
  },
  "include": ["src/**/*"],
  "exclude": ["node_modules"]
}
Tạo thư mục cho mã nguồn:
mkdir src
touch src/index.ts
Tạo file server.py:
touch server.py
Cài các gói NuGet cần thiết:
dotnet add package ModelContextProtocol --prerelease
dotnet add package Microsoft.Extensions.Hosting
Với project Java Spring Boot, cấu trúc project được tạo tự động.
Với Rust, file src/main.rs được tạo mặc định khi chạy cargo init. Mở file và xoá code mặc định.
Bước 4: viết code server
Tạo file index.ts và thêm code sau:
import { McpServer, ResourceTemplate } from "@modelcontextprotocol/sdk/server/mcp.js";
import { StdioServerTransport } from "@modelcontextprotocol/sdk/server/stdio.js";
import { z } from "zod";

// Create an MCP server
const server = new McpServer({
  name: "Calculator MCP Server",
  version: "1.0.0"
});
Giờ bạn đã có server, nhưng nó chưa làm được gì nhiều; hãy sửa điều đó.
# server.py
from mcp.server.fastmcp import FastMCP

# Create an MCP server
mcp = FastMCP("Demo")
using Microsoft.Extensions.DependencyInjection;
using Microsoft.Extensions.Hosting;
using Microsoft.Extensions.Logging;
using ModelContextProtocol.Server;
using System.ComponentModel;

var builder = Host.CreateApplicationBuilder(args);
builder.Logging.AddConsole(consoleLogOptions =>
{
    // Configure all logs to go to stderr
    consoleLogOptions.LogToStandardErrorThreshold = LogLevel.Trace;
});

builder.Services
    .AddMcpServer()
    .WithStdioServerTransport()
    .WithToolsFromAssembly();
await builder.Build().RunAsync();

// add features
Với Java, tạo các thành phần cốt lõi của server. Trước hết, sửa lớp ứng dụng chính src/main/java/com/microsoft/mcp/sample/server/McpServerApplication.java:
package com.microsoft.mcp.sample.server;

import org.springframework.ai.tool.ToolCallbackProvider;
import org.springframework.ai.tool.method.MethodToolCallbackProvider;
import org.springframework.boot.SpringApplication;
import org.springframework.boot.autoconfigure.SpringBootApplication;
import org.springframework.context.annotation.Bean;
import com.microsoft.mcp.sample.server.service.CalculatorService;

@SpringBootApplication
public class McpServerApplication {

    public static void main(String[] args) {
        SpringApplication.run(McpServerApplication.class, args);
    }

    @Bean
    public ToolCallbackProvider calculatorTools(CalculatorService calculator) {
        return MethodToolCallbackProvider.builder().toolObjects(calculator).build();
    }
}
Tạo service máy tính src/main/java/com/microsoft/mcp/sample/server/service/CalculatorService.java:
package com.microsoft.mcp.sample.server.service;

import org.springframework.ai.tool.annotation.Tool;
import org.springframework.stereotype.Service;

/**
 * Service for basic calculator operations.
 * This service provides simple calculator functionality through MCP.
 */
@Service
public class CalculatorService {

    /**
     * Add two numbers
     * @param a The first number
     * @param b The second number
     * @return The sum of the two numbers
     */
    @Tool(description = "Add two numbers together")
    public String add(double a, double b) {
        double result = a + b;
        return formatResult(a, "+", b, result);
    }

    /**
     * Subtract one number from another
     * @param a The number to subtract from
     * @param b The number to subtract
     * @return The result of the subtraction
     */
    @Tool(description = "Subtract the second number from the first number")
    public String subtract(double a, double b) {
        double result = a - b;
        return formatResult(a, "-", b, result);
    }

    /**
     * Multiply two numbers
     * @param a The first number
     * @param b The second number
     * @return The product of the two numbers
     */
    @Tool(description = "Multiply two numbers together")
    public String multiply(double a, double b) {
        double result = a * b;
        return formatResult(a, "*", b, result);
    }

    /**
     * Divide one number by another
     * @param a The numerator
     * @param b The denominator
     * @return The result of the division
     */
    @Tool(description = "Divide the first number by the second number")
    public String divide(double a, double b) {
        if (b == 0) {
            return "Error: Cannot divide by zero";
        }
        double result = a / b;
        return formatResult(a, "/", b, result);
    }

    /**
     * Calculate the power of a number
     * @param base The base number
     * @param exponent The exponent
     * @return The result of raising the base to the exponent
     */
    @Tool(description = "Calculate the power of a number (base raised to an exponent)")
    public String power(double base, double exponent) {
        double result = Math.pow(base, exponent);
        return formatResult(base, "^", exponent, result);
    }

    /**
     * Calculate the square root of a number
     * @param number The number to find the square root of
     * @return The square root of the number
     */
    @Tool(description = "Calculate the square root of a number")
    public String squareRoot(double number) {
        if (number < 0) {
            return "Error: Cannot calculate square root of a negative number";
        }
        double result = Math.sqrt(number);
        return String.format("√%.2f = %.2f", number, result);
    }

    /**
     * Calculate the modulus (remainder) of division
     * @param a The dividend
     * @param b The divisor
     * @return The remainder of the division
     */
    @Tool(description = "Calculate the remainder when one number is divided by another")
    public String modulus(double a, double b) {
        if (b == 0) {
            return "Error: Cannot divide by zero";
        }
        double result = a % b;
        return formatResult(a, "%", b, result);
    }

    /**
     * Calculate the absolute value of a number
     * @param number The number to find the absolute value of
     * @return The absolute value of the number
     */
    @Tool(description = "Calculate the absolute value of a number")
    public String absolute(double number) {
        double result = Math.abs(number);
        return String.format("|%.2f| = %.2f", number, result);
    }

    /**
     * Get help about available calculator operations
     * @return Information about available operations
     */
    @Tool(description = "Get help about available calculator operations")
    public String help() {
        return "Basic Calculator MCP Service\n\n" +
               "Available operations:\n" +
               "1. add(a, b) - Adds two numbers\n" +
               "2. subtract(a, b) - Subtracts the second number from the first\n" +
               "3. multiply(a, b) - Multiplies two numbers\n" +
               "4. divide(a, b) - Divides the first number by the second\n" +
               "5. power(base, exponent) - Raises a number to a power\n" +
               "6. squareRoot(number) - Calculates the square root\n" +
               "7. modulus(a, b) - Calculates the remainder of division\n" +
               "8. absolute(number) - Calculates the absolute value\n\n" +
               "Example usage: add(5, 3) will return 5 + 3 = 8";
    }

    /**
     * Format the result of a calculation
     */
    private String formatResult(double a, String operator, double b, double result) {
        return String.format("%.2f %s %.2f = %.2f", a, operator, b, result);
    }
}
Các thành phần tuỳ chọn cho service sẵn sàng production:
Tạo cấu hình khởi động src/main/java/com/microsoft/mcp/sample/server/config/StartupConfig.java:
package com.microsoft.mcp.sample.server.config;

import org.springframework.boot.CommandLineRunner;
import org.springframework.context.annotation.Bean;
import org.springframework.context.annotation.Configuration;

@Configuration
public class StartupConfig {

    @Bean
    public CommandLineRunner startupInfo() {
        return args -> {
            System.out.println("\n" + "=".repeat(60));
            System.out.println("Calculator MCP Server is starting...");
            System.out.println("SSE endpoint: http://localhost:8080/sse");
            System.out.println("Health check: http://localhost:8080/actuator/health");
            System.out.println("=".repeat(60) + "\n");
        };
    }
}
Tạo health controller src/main/java/com/microsoft/mcp/sample/server/controller/HealthController.java:
package com.microsoft.mcp.sample.server.controller;

import org.springframework.http.ResponseEntity;
import org.springframework.web.bind.annotation.GetMapping;
import org.springframework.web.bind.annotation.RestController;
import java.time.LocalDateTime;
import java.util.HashMap;
import java.util.Map;

@RestController
public class HealthController {

    @GetMapping("/health")
    public ResponseEntity<Map<String, Object>> healthCheck() {
        Map<String, Object> response = new HashMap<>();
        response.put("status", "UP");
        response.put("timestamp", LocalDateTime.now().toString());
        response.put("service", "Calculator MCP Server");
        return ResponseEntity.ok(response);
    }
}
Tạo exception handler src/main/java/com/microsoft/mcp/sample/server/exception/GlobalExceptionHandler.java:
package com.microsoft.mcp.sample.server.exception;

import org.springframework.http.HttpStatus;
import org.springframework.http.ResponseEntity;
import org.springframework.web.bind.annotation.ExceptionHandler;
import org.springframework.web.bind.annotation.RestControllerAdvice;

@RestControllerAdvice
public class GlobalExceptionHandler {

    @ExceptionHandler(IllegalArgumentException.class)
    public ResponseEntity<ErrorResponse> handleIllegalArgumentException(IllegalArgumentException ex) {
        ErrorResponse error = new ErrorResponse(
            "Invalid_Input",
            "Invalid input parameter: " + ex.getMessage());
        return new ResponseEntity<>(error, HttpStatus.BAD_REQUEST);
    }

    public static class ErrorResponse {
        private String code;
        private String message;

        public ErrorResponse(String code, String message) {
            this.code = code;
            this.message = message;
        }

        // Getters
        public String getCode() { return code; }
        public String getMessage() { return message; }
    }
}
Tạo banner tuỳ chỉnh src/main/resources/banner.txt:
_____      _            _       _
 / ____|    | |          | |     | |
| |     __ _| | ___ _   _| | __ _| |_ ___  _ __
| |    / _` | |/ __| | | | |/ _` | __/ _ \| '__|
| |___| (_| | | (__| |_| | | (_| | || (_) | |
 \_____\__,_|_|\___|\__,_|_|\__,_|\__\___/|_|

Calculator MCP Server v1.0
Spring Boot MCP Application
Thêm đoạn code sau vào đầu file src/main.rs. Nó import các thư viện và module cần cho MCP server.
use rmcp::{
    handler::server::{router::tool::ToolRouter, tool::Parameters},
    model::{ServerCapabilities, ServerInfo},
    schemars, tool, tool_handler, tool_router,
    transport::stdio,
    ServerHandler, ServiceExt,
};
use std::error::Error;
Server máy tính sẽ đơn giản, chỉ cộng hai số. Hãy tạo một struct biểu diễn yêu cầu tính toán.
#[derive(Debug, serde::Deserialize, schemars::JsonSchema)]
pub struct CalculatorRequest {
    pub a: f64,
    pub b: f64,
}
Tiếp theo, tạo một struct biểu diễn server máy tính. Struct này giữ tool router, dùng để đăng ký tool.
#[derive(Debug, Clone)]
pub struct Calculator {
    tool_router: ToolRouter<Self>,
}
Giờ cài đặt struct Calculator để tạo instance server mới, và cài đặt server handler để cung cấp thông tin server.
#[tool_router]
impl Calculator {
    pub fn new() -> Self {
        Self {
            tool_router: Self::tool_router(),
        }
    }
}

#[tool_handler]
impl ServerHandler for Calculator {
    fn get_info(&self) -> ServerInfo {
        ServerInfo {
            instructions: Some("A simple calculator tool".into()),
            capabilities: ServerCapabilities::builder().enable_tools().build(),
            ..Default::default()
        }
    }
}
Cuối cùng, cài đặt hàm main để khởi động server. Hàm này tạo một instance Calculator và phục vụ nó qua standard input/output.
#[tokio::main]
async fn main() -> Result<(), Box<dyn Error>> {
    let service = Calculator::new().serve(stdio()).await?;
    service.waiting().await?;
    Ok(())
}
Server giờ đã cung cấp thông tin cơ bản về chính nó. Tiếp theo, chúng ta thêm một tool để cộng.
Bước 5: thêm tool và resource
Thêm một tool và một resource bằng code sau:
server.tool(
  "add",
  { a: z.number(), b: z.number() },
  async ({ a, b }) => ({
    content: [{ type: "text", text: String(a + b) }]
  })
);

server.resource(
  "greeting",
  new ResourceTemplate("greeting://{name}", { list: undefined }),
  async (uri, { name }) => ({
    contents: [{
      uri: uri.href,
      text: `Hello, ${name}!`
    }]
  })
);
Tool nhận tham số a và b, chạy một hàm trả về phản hồi dạng:
{
  contents: [{
    type: "text", content: "some content"
  }]
}
Resource được truy cập qua chuỗi "greeting", nhận tham số name và trả về phản hồi tương tự tool:
{
  uri: "<href>",
  text: "a text"
}
# Add an addition tool
@mcp.tool()
def add(a: int, b: int) -> int:
    """Add two numbers"""
    return a + b


# Add a dynamic greeting resource
@mcp.resource("greeting://{name}")
def get_greeting(name: str) -> str:
    """Get a personalized greeting"""
    return f"Hello, {name}!"
Trong code trên, chúng ta:
- Định nghĩa tool
addnhận tham sốavàb, đều là số nguyên. - Tạo resource tên
greetingnhận tham sốname.
Thêm đoạn này vào file Program.cs:
[McpServerToolType]
public static class CalculatorTool
{
    [McpServerTool, Description("Adds two numbers")]
    public static string Add(int a, int b) => $"Sum {a + b}";
}
Các tool đã được tạo ở bước trước.
Thêm một tool mới bên trong khối impl Calculator:
#[tool(description = "Adds a and b")]
async fn add(
    &self,
    Parameters(CalculatorRequest { a, b }): Parameters<CalculatorRequest>,
) -> String {
    (a + b).to_string()
}
Bước 6: code hoàn chỉnh
Thêm đoạn code cuối cùng để server khởi động được:
// Start receiving messages on stdin and sending messages on stdout
const transport = new StdioServerTransport();
await server.connect(transport);
Đây là code đầy đủ:
// index.ts
import { McpServer, ResourceTemplate } from "@modelcontextprotocol/sdk/server/mcp.js";
import { StdioServerTransport } from "@modelcontextprotocol/sdk/server/stdio.js";
import { z } from "zod";

// Create an MCP server
const server = new McpServer({
  name: "Calculator MCP Server",
  version: "1.0.0"
});

// Add an addition tool
server.tool(
  "add",
  { a: z.number(), b: z.number() },
  async ({ a, b }) => ({
    content: [{ type: "text", text: String(a + b) }]
  })
);

// Add a dynamic greeting resource
server.resource(
  "greeting",
  new ResourceTemplate("greeting://{name}", { list: undefined }),
  async (uri, { name }) => ({
    contents: [{
      uri: uri.href,
      text: `Hello, ${name}!`
    }]
  })
);

// Start receiving messages on stdin and sending messages on stdout
const transport = new StdioServerTransport();
server.connect(transport);
# server.py
from mcp.server.fastmcp import FastMCP

# Create an MCP server
mcp = FastMCP("Demo")


# Add an addition tool
@mcp.tool()
def add(a: int, b: int) -> int:
    """Add two numbers"""
    return a + b


# Add a dynamic greeting resource
@mcp.resource("greeting://{name}")
def get_greeting(name: str) -> str:
    """Get a personalized greeting"""
    return f"Hello, {name}!"

# Main execution block - this is required to run the server
if __name__ == "__main__":
    mcp.run()
Tạo file Program.cs với nội dung:
using Microsoft.Extensions.DependencyInjection;
using Microsoft.Extensions.Hosting;
using Microsoft.Extensions.Logging;
using ModelContextProtocol.Server;
using System.ComponentModel;

var builder = Host.CreateApplicationBuilder(args);
builder.Logging.AddConsole(consoleLogOptions =>
{
    // Configure all logs to go to stderr
    consoleLogOptions.LogToStandardErrorThreshold = LogLevel.Trace;
});

builder.Services
    .AddMcpServer()
    .WithStdioServerTransport()
    .WithToolsFromAssembly();
await builder.Build().RunAsync();

[McpServerToolType]
public static class CalculatorTool
{
    [McpServerTool, Description("Adds two numbers")]
    public static string Add(int a, int b) => $"Sum {a + b}";
}
Lớp ứng dụng chính hoàn chỉnh trông như sau:
// McpServerApplication.java
package com.microsoft.mcp.sample.server;

import org.springframework.ai.tool.ToolCallbackProvider;
import org.springframework.ai.tool.method.MethodToolCallbackProvider;
import org.springframework.boot.SpringApplication;
import org.springframework.boot.autoconfigure.SpringBootApplication;
import org.springframework.context.annotation.Bean;
import com.microsoft.mcp.sample.server.service.CalculatorService;

@SpringBootApplication
public class McpServerApplication {

    public static void main(String[] args) {
        SpringApplication.run(McpServerApplication.class, args);
    }

    @Bean
    public ToolCallbackProvider calculatorTools(CalculatorService calculator) {
        return MethodToolCallbackProvider.builder().toolObjects(calculator).build();
    }
}
Code hoàn chỉnh của server Rust:
use rmcp::{
    ServerHandler, ServiceExt,
    handler::server::{router::tool::ToolRouter, tool::Parameters},
    model::{ServerCapabilities, ServerInfo},
    schemars, tool, tool_handler, tool_router,
    transport::stdio,
};
use std::error::Error;

#[derive(Debug, serde::Deserialize, schemars::JsonSchema)]
pub struct CalculatorRequest {
    pub a: f64,
    pub b: f64,
}

#[derive(Debug, Clone)]
pub struct Calculator {
    tool_router: ToolRouter<Self>,
}

#[tool_router]
impl Calculator {
    pub fn new() -> Self {
        Self {
            tool_router: Self::tool_router(),
        }
    }

    #[tool(description = "Adds a and b")]
    async fn add(
        &self,
        Parameters(CalculatorRequest { a, b }): Parameters<CalculatorRequest>,
    ) -> String {
        (a + b).to_string()
    }
}

#[tool_handler]
impl ServerHandler for Calculator {
    fn get_info(&self) -> ServerInfo {
        ServerInfo {
            instructions: Some("A simple calculator tool".into()),
            capabilities: ServerCapabilities::builder().enable_tools().build(),
            ..Default::default()
        }
    }
}

#[tokio::main]
async fn main() -> Result<(), Box<dyn Error>> {
    let service = Calculator::new().serve(stdio()).await?;
    service.waiting().await?;
    Ok(())
}
Bước 7: kiểm thử server
Khởi động server bằng lệnh sau:
npm run build
mcp run server.py
Để dùng MCP Inspector, hãy chạy mcp dev server.py: lệnh này tự mở Inspector và cung cấp session token cần thiết cho proxy. Nếu dùng mcp run server.py, bạn phải tự khởi động Inspector và cấu hình kết nối.
Đảm bảo bạn đang ở thư mục project:
cd McpCalculatorServer
dotnet run
./mvnw clean install -DskipTests
java -jar target/calculator-server-0.0.1-SNAPSHOT.jar
Chạy các lệnh sau để định dạng code và chạy server:
cargo fmt
cargo run
Bước 8: chạy bằng Inspector
Inspector là công cụ tuyệt vời: nó khởi động server và cho phép bạn tương tác để kiểm tra server hoạt động. Hãy khởi động nó. Lưu ý: trường "command" trên giao diện có thể trông khác, vì nó chứa lệnh chạy server theo runtime cụ thể của bạn.
npx @modelcontextprotocol/inspector node build/index.js
hoặc thêm vào package.json như sau: "inspector": "npx @modelcontextprotocol/inspector node build/index.js" rồi chạy npm run inspector.
Python bọc một công cụ Node.js tên inspector. Có thể gọi công cụ đó như sau:
mcp dev server.py
Tuy nhiên, nó không cài đặt mọi phương thức của công cụ, nên bạn được khuyên chạy trực tiếp công cụ Node.js như dưới:
npx @modelcontextprotocol/inspector mcp run server.py
Nếu dùng công cụ hoặc IDE cho phép cấu hình lệnh và đối số để chạy script, hãy đặt python ở trường Command và server.py ở Arguments để script chạy đúng.
Đảm bảo bạn đang ở thư mục project:
cd McpCalculatorServer
npx @modelcontextprotocol/inspector dotnet run
Đảm bảo server máy tính đang chạy, rồi chạy inspector:
npx @modelcontextprotocol/inspector
Trên giao diện web của inspector:
- Chọn "SSE" làm loại transport.
- Đặt URL là
http://localhost:8080/sse. - Bấm "Connect".
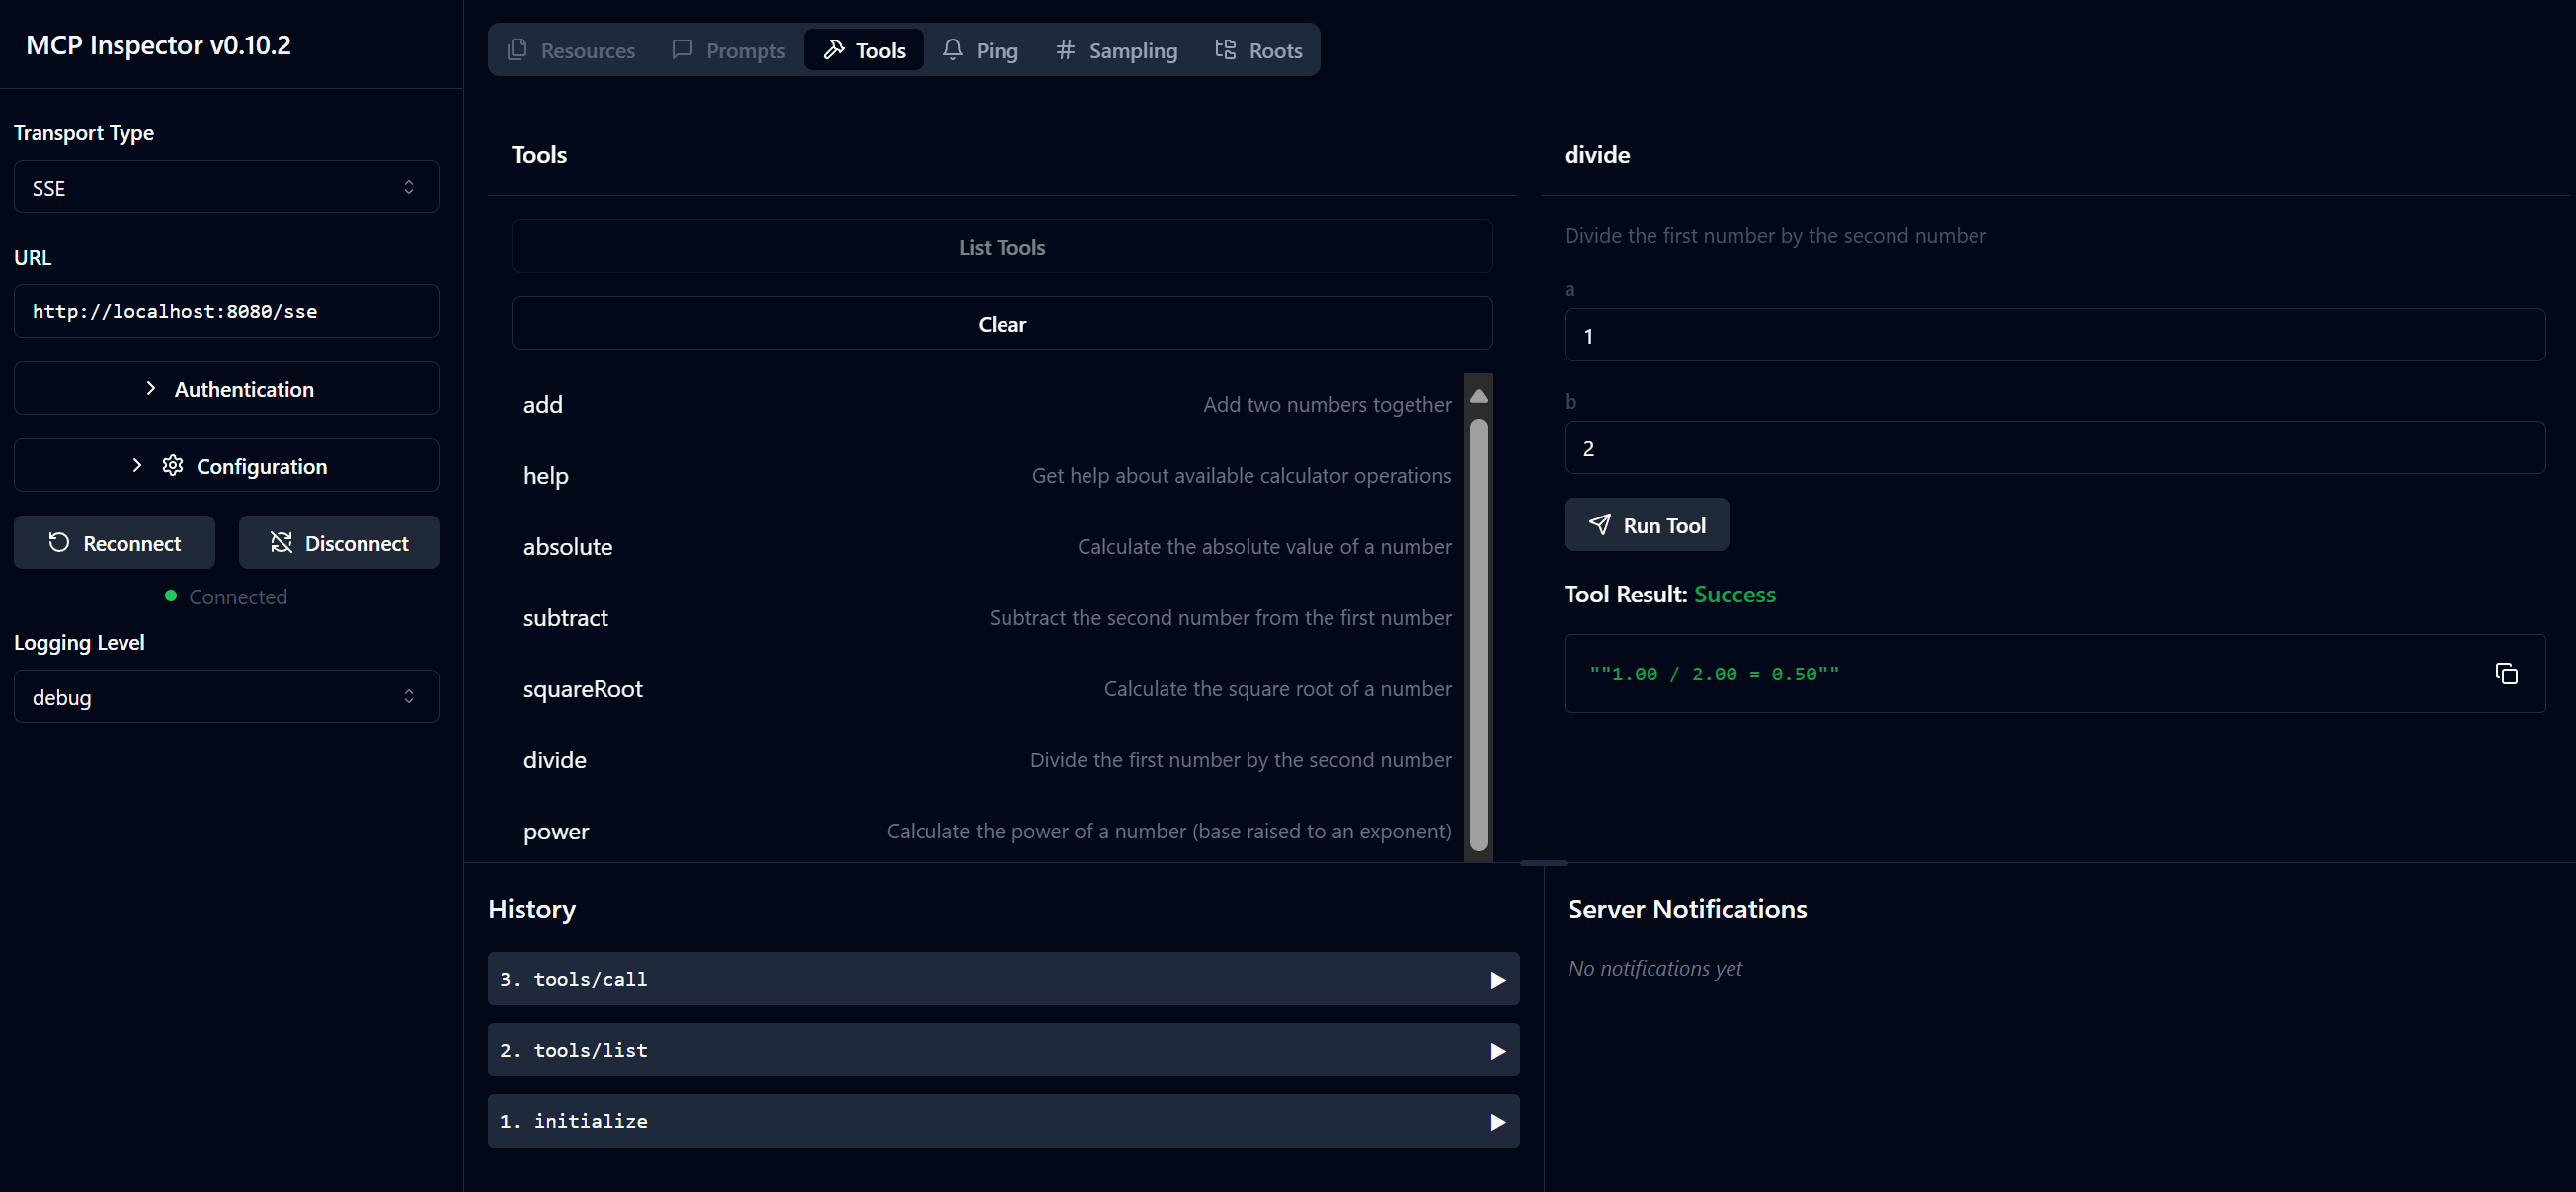
Bạn đã kết nối tới server. Phần kiểm thử server Java đến đây là xong.
Để chạy server Rust với MCP Inspector CLI, dùng lệnh:
npx @modelcontextprotocol/inspector cargo run --cli --method tools/call --tool-name add --tool-arg a=1 b=2
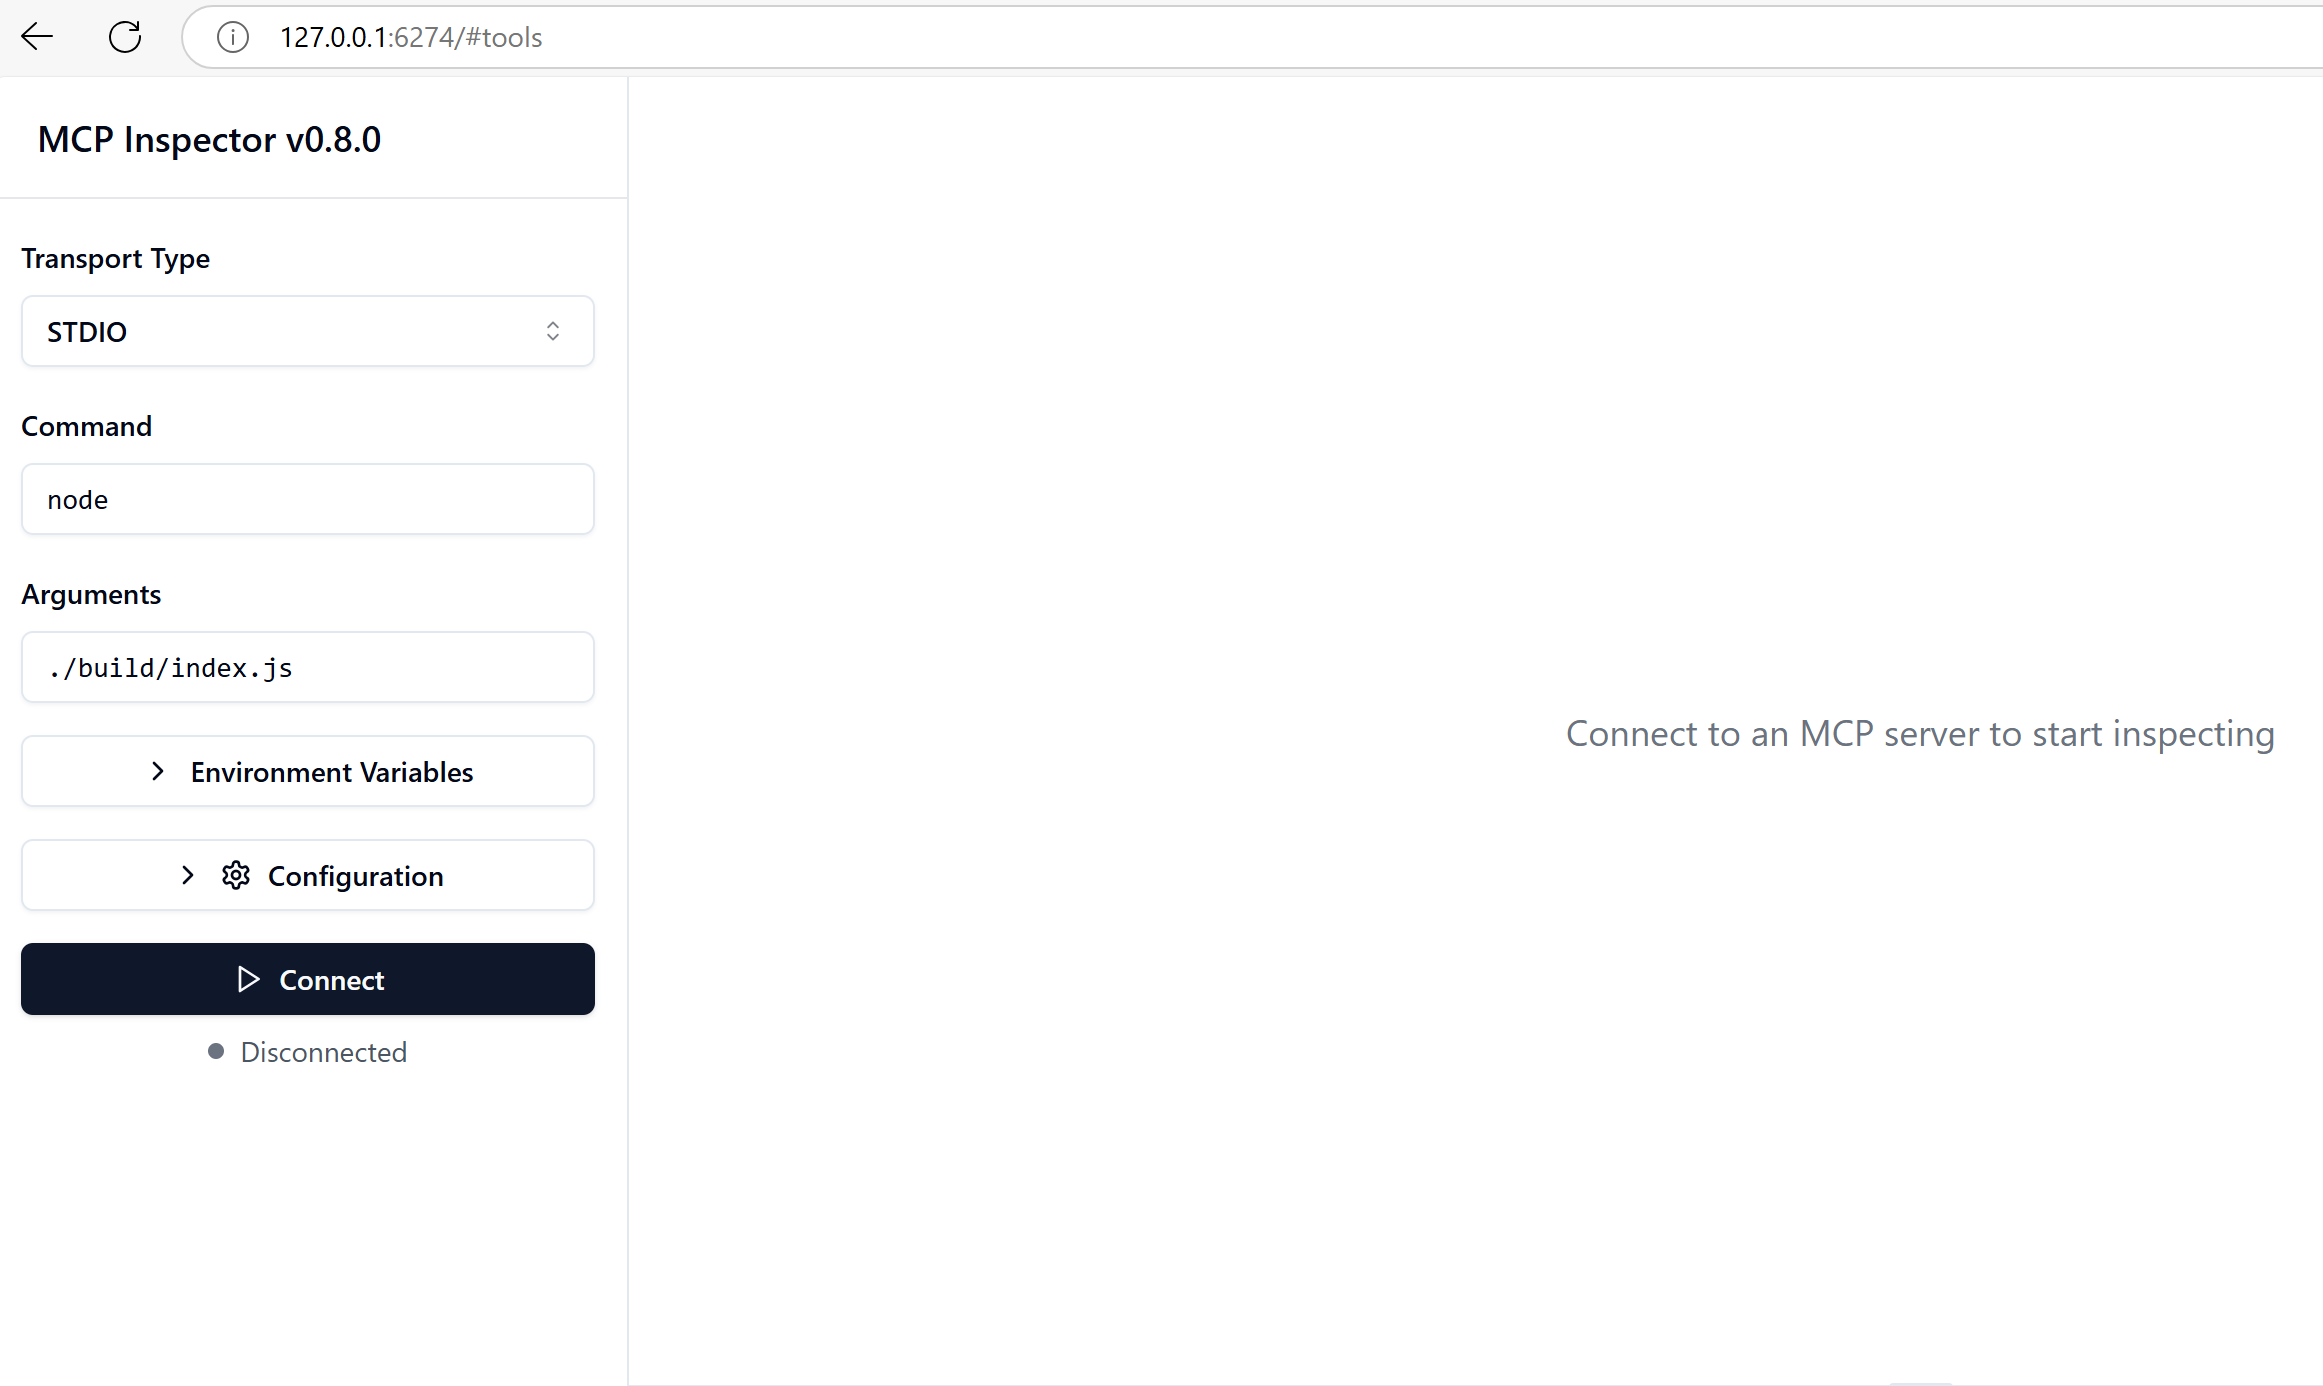
Phần tiếp theo là tương tác với server. Bạn sẽ thấy giao diện sau:
-
Kết nối tới server bằng nút Connect. Sau khi kết nối, bạn sẽ thấy:
-
Chọn "Tools" rồi "listTools", bạn sẽ thấy "Add" xuất hiện. Chọn "Add" và điền giá trị tham số. Bạn sẽ thấy phản hồi, tức kết quả từ tool "add":
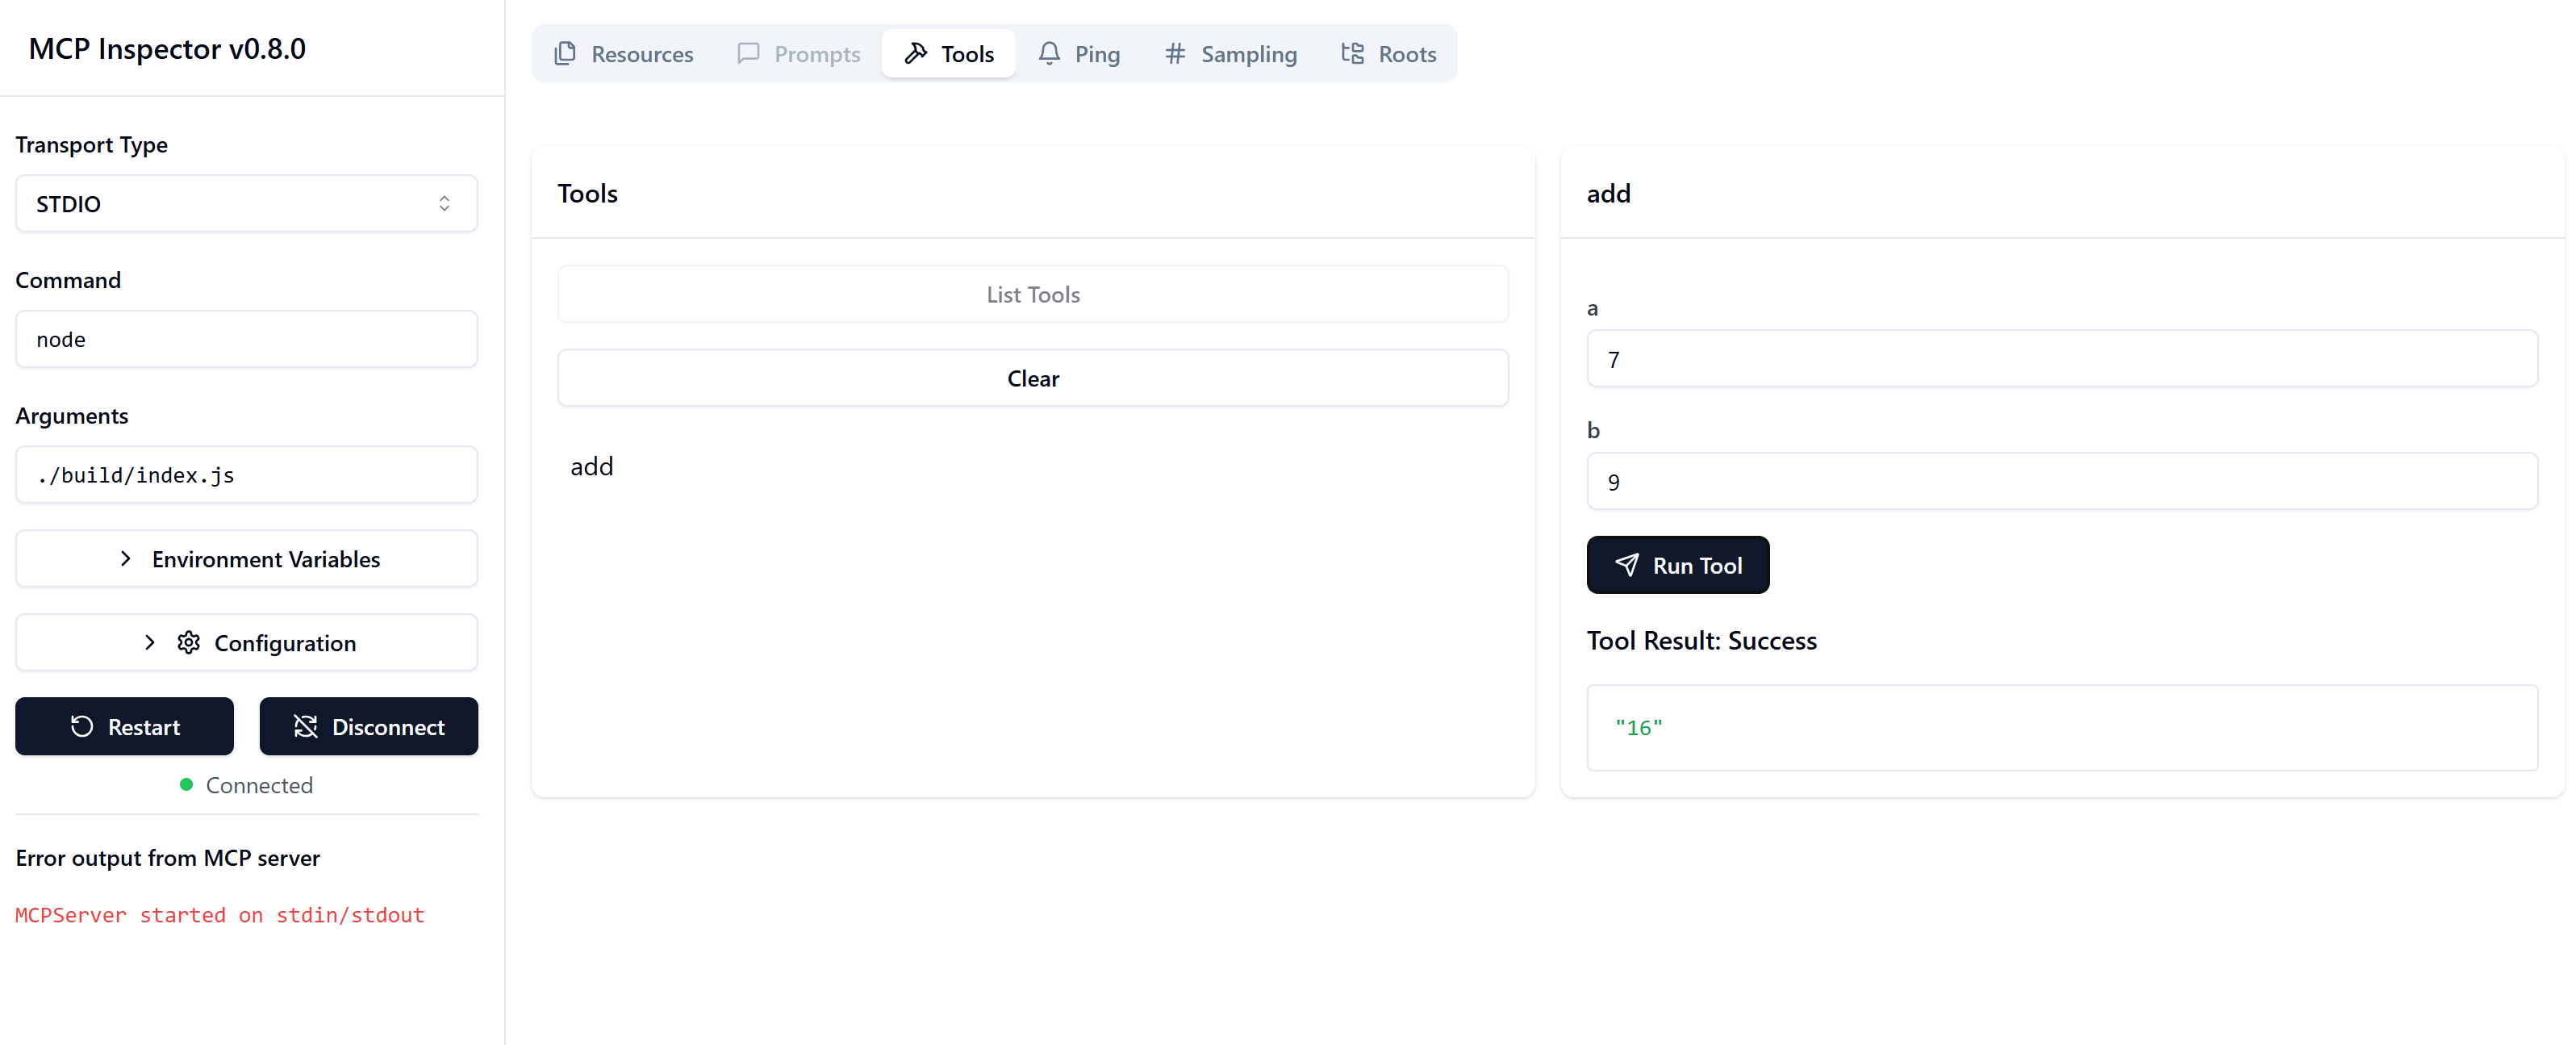
Chúc mừng, bạn đã tạo và chạy được server đầu tiên!
SDK chính thức
MCP có SDK chính thức cho nhiều ngôn ngữ:
- C# SDK: duy trì cùng Microsoft
- Java SDK: duy trì cùng Spring AI
- TypeScript SDK: bản cài đặt TypeScript chính thức
- Python SDK: bản cài đặt Python chính thức
- Kotlin SDK: bản cài đặt Kotlin chính thức
- Swift SDK: duy trì cùng Loopwork AI
- Rust SDK: bản cài đặt Rust chính thức
Điểm chính
- Thiết lập môi trường phát triển MCP khá đơn giản nhờ SDK cho từng ngôn ngữ.
- Xây MCP server gồm tạo và đăng ký các tool với schema rõ ràng.
- Kiểm thử và gỡ lỗi là thiết yếu để phần cài đặt MCP đáng tin cậy.
Mẫu code
- Java Calculator
- .NET Calculator
- JavaScript Calculator
- TypeScript Calculator
- Python Calculator
- Rust Calculator
Bài tập
Tạo một MCP server đơn giản với một tool do bạn chọn:
- Cài đặt tool bằng ngôn ngữ bạn thích (.NET, Java, Python, TypeScript hoặc Rust).
- Định nghĩa tham số đầu vào và giá trị trả về.
- Chạy inspector để đảm bảo server hoạt động như dự định.
- Kiểm thử phần cài đặt với nhiều đầu vào khác nhau.
Lời giải: solution.
Tài liệu thêm
- Build Agents using Model Context Protocol on Azure
- Remote MCP with Azure Container Apps (Node.js/TypeScript/JavaScript)
- .NET OpenAI MCP Agent
Bài tiếp theo: Xây MCP client đầu tiên.
Nguồn
- Dịch và biên tập từ microsoft/mcp-for-beginners · 03-GettingStarted/01-first-server/README.md, giấy phép MIT.